Adding a Tag Cloud to my Hugo blog
# 1. Tags Template Page
The first step is to figure out which template is generating the HTML for the /tags/ page.
Depending on the complexity of your theme, this is more or less difficult.
The theme I’m using as a base (Vienna) is structurally quite simple, so it didn’t take too long: themes/vienna/layouts/_default/terms.html This terms.html) template file is relatively simple, so it serves as a good starting point for building your own.
If you are having more trouble, make sure you remember that “tags” is one of the taxonomies in Hugo. Hugo’s template lookup order for taxonomy pages (e.g. tags, categories etc.) is specified here: https://gohugo.io/templates/lookup-order/#examples-layout-lookup-for-taxonomy-pages
# 2. Generate a Javascript object from all tags
To be able to use the tags data interactively in the page, I outputted it into a Javascript object from Hugo. You can use either a Map or an Array, depending on what you want to do with it:
| |
# 3. Use wordcloud2.js to generate a wordcloud
While searching around for a project that already implements an algorithm for generating a wordcloud, I came across the Word Cloud Generator website (try it online). This seemed to be exactly what I was looking for. Luckily, the core functionality of this website has been packaged into a library with a straightforward API and no dependencies - great!
https://github.com/timdream/wordcloud2.js
To get started, I added the following HTML snippet to my terms.html template:
| |
You might need to play with the weight factor to get the right size of the words for them to fill up the entire area (depending on the amount of tags and their weights). See also issue 153 for directions on how to get the right size.
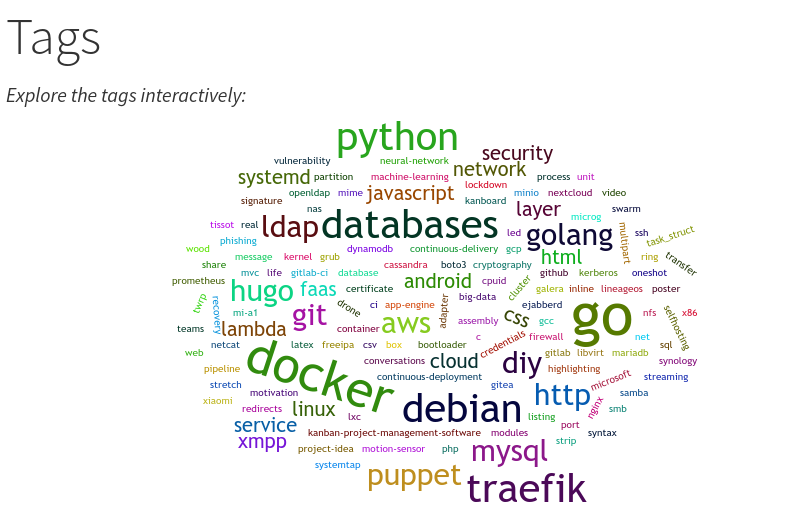
The result was pretty fancy!
In general, have a look at the all the available options (API) for generating the word cloud.
# 4. Generate HTML elements instead of Image
While the result above looks nice, it was completely non-interactive due to it being a <canvas> element (essentially just an image).
Depending on the use case, this might be fine, but I wanted the tags in the cloud to actually be clickable links, to make it easy to explore my blog.
After all, this is the world wide web with hypertext.
Fortunately, Wordcloud2.js not only offers the option of generating a wordcloud in a canvas element, but also the generate the words as regular span elements (text).
To use this functionality, we only need to supply a <div> element (instead of <canvas>) to the constructor:
| |
Make sure you specify non-zero width and height for the wrapper container, otherwise the library cannot calculate the size of the words and ends up outputting nothing at all.
Now the code generates <span> elements inside the wrapper container, but it’s still not interactive (i.e. no links).
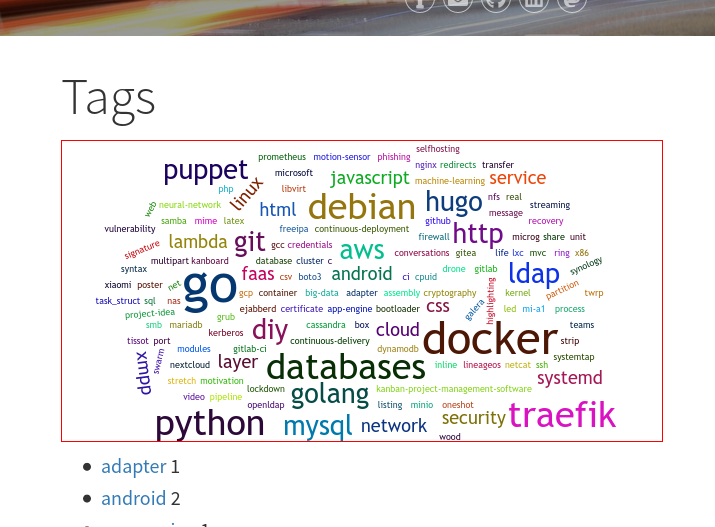
# 5. Make tags into links
To convert the tags (inside <span>) into functioning links (<a>), I found this helpful comment on issue 133.
It suggests a solution using jQuery, so I just reimplemented the same functionality with vanilla Javascript:
| |
First, I’m telling Wordcloud2.js to add the CSS class “tag-cloud-item” (this is an arbitrary name) to each word element it is generating (line 4).
Then, once the library finished creating the elements (event “wordcloudstop”, line 7), I iterate over all elements with this class (line 9) and convert the text inside the span into an <a> link (line 10 and 11).
The color is also set to inherit to preserve the colorful look of the wordcloud, otherwise all links would have the same color (line 11).
# Done!
Go check it out live: Jack’s Blog Tags