End-to-end setup of a serverless database with Firebase

There are many examples and tutorials online on how to get started with Firebase, set up the individual components etc. In this post I want to take a different angle: rather than showing small separate snippets that you need to figure out how to glue together, I will outline a complete end-to-end application with Firebase. As an example usecase, the web app built in this post will serve as a message board, where users can view “news” (i.e. short messages with names and timestamps) and - if they are signed in - post news.

  1. User authentication: implemented with Firebase Authentication “Sign-in with Google”
  2. User management: implemented with Firebase Functions
  3. Database access & authorization: implemented with Cloud Firestore
  4. Optional loading of Firebase SDK: only loaded SDK components when necessary, but not on every page load

If that sounds like your cup of tea, let’s get started.

#  User authentication

I will not replicate the steps for getting started with a Firebase project in this post. You can find the most up-to-date information in the Firebase documentation.

At the end, you should have a snippet similar to the following in the HTML of your web app:

 1
 2
 3
 4
 5
 6
 7
 8
 9
10
11
12
13
14
15
16
17
18
19
20
<!-- The core Firebase JS SDK is always required and must be listed first -->
<script src="https://www.gstatic.com/firebasejs/8.0.2/firebase-app.js"></script>

<!-- Specific SDKs for Firebase products
     https://firebase.google.com/docs/web/setup#available-libraries -->
<script src="https://www.gstatic.com/firebasejs/8.0.2/firebase-auth.js"></script>

<script>
  var firebaseConfig = {
    apiKey: "XXXX",
    authDomain: "xxxx.firebaseapp.com",
    databaseURL: "https://xxxx.firebaseio.com",
    projectId: "xxxxx",
    storageBucket: "xxxxx.appspot.com",
    messagingSenderId: "xxxxx",
    appId: "xxxx"
  };
  // Initialize Firebase
  firebase.initializeApp(firebaseConfig);
</script>

So far, this is just initializing the base Firebase SDK and the authentication component. To actually log in now, we need to trigger the Firebase sign in dialog, in this case with GoogleAuthProvider (setup documentation). The simplest way to do this is adding a fake <a> link to the site (line 1) and attaching an onClick event listener (line 23). We also store the signed in user in a global variable, so we can easily access the user’s details later (line 17).

 1
 2
 3
 4
 5
 6
 7
 8
 9
10
11
12
13
14
15
16
17
18
19
20
21
22
23
24
<a href="" id="sign-in-button">Sign In with Google</a>

<script>
  let loggedInUser = null;

  function signInHandler(e) {
    e.preventDefault();
    const provider = new firebase.auth.GoogleAuthProvider();
    provider.addScope('email');

    firebase.auth().signInWithPopup(provider).then(function(result) {
        // This gives you a Google Access Token. You can use it to access the Google API.
        const token = result.credential.accessToken;
        // The signed-in user info.
        const user = result.user;
        console.log("Signed in user:", user);
        loggedInUser = user;
    }).catch(function(error) {
        console.error("Sign in error:", error);
        e.src.innerHTML = "Error!";
    });
  }
  document.getElementById("sign-in-button").addEventListener('click', signInHandler);
</script>

After setting up Sign In with Google in our Firebase project, we can already give our setup a first try. Open up your web app and try to sign in. Make sure there is no “Sign in error” in the developer console, just the “Signed in user” info (I had trouble with this in Firefox Private Mode, but it worked fine with Chromium).

If you use just the code above, you will notice you need to re-login after each page reload manually. To fix this, we need to observe the authentication status of the current user.

1
2
3
4
5
6
7
8
9
firebase.auth().onAuthStateChanged(function(user) {
    if (user) {
        console.debug("User already signed in")
        loggedInUser = user;
    } else {
        console.debug("No user signed in");
        document.getElementById("sign-in-button").style.display = block; // change from none
    }
});

If the user has signed in previously, he or she will automatically be authenticated (logged in) through the onAuthStateChanged observer. If not, we make the Sign in button visible (assuming that it’s hidden by default).

#  User management

The next step is triggering a Firebase Function when a new user signs up (not logs in) in the web app. This cloud function will create an entity for the user in our Cloud Firestore database. You might be wondering why this is necessary, since Firebase Authentication already has a record for the user. It is required to authorize the user in the database (i.e. check if the user is allowed to perform an action), as we will see in the next step.

The following code is an adaption of Firebase function example “Welcome email” and the database cleanup usecase.

 1
 2
 3
 4
 5
 6
 7
 8
 9
10
11
12
13
14
15
16
17
18
19
20
21
22
23
// Put newly signed up user into the database without newswriter privileges

const functions = require('firebase-functions');
const admin = require('firebase-admin');
admin.initializeApp();
const firestore = admin.firestore();

exports.signupUser = functions.auth.user().onCreate((user) => {
    const uid = user.uid;
    const email = user.email;
    const displayName = user.displayName;

    return putUserIntoDb(uid, email, displayName);
});

async function putUserIntoDb(uid, email, name) {
    return firestore.collection(`User`).doc(uid).set({
        uid: uid,
        email: email,
        name: name,
        newswriter: false,
    });
}

This function will be triggered whenever a new user signs in (onCreate). A very important aspect to note here is the ID of the entity we are creating. It is not auto-generated by Firestore (as it would happen with the .add() function), instead we are explicitely setting it to the UID of the user (.doc(uid).set()). In the next step, this will allow us to easily and quickly query the user document for authorization purposes in the next step.

The created entity in the User collection will have the following structure:

1
2
3
4
5
6
{
    "uid": "abc123...",
    "email": "max@example.com",
    "name": "Max",
    "newswriter": false
}

Now is another good point in time to make sure what we have built so far works. Delete your user from Firebase, set up Cloud Firestore in Native mode, deploy the Firebase function, reload your web app and sign in.

Afterwards, you should be able to see an entity for your user in the “User” collection in Cloud Firestore Viewer. If not, check the Firebase function logs.

#  Database access & authorization

The next step will be to allow our users to directly access the database (or at least certain parts of it) without having to write a custom backend for it, which makes this approach “serverless”.

https://firebase.google.com/docs/firestore/quickstart

Firestore enables this usecase by allowing to specify “security rules”. The default rule only allows the project admin to access the database:

1
2
3
4
5
6
7
8
rules_version = '2';
service cloud.firestore {
  match /databases/{database}/documents {
    match /{document=**} {
      allow read, write: if false;
    }
  }
}

To allow users to access the database, we need to append another rule after the match document ** block (no comma or semicolon required):

1
2
3
4
    match /News/{document} {
        allow read: if request.auth != null;
        allow create: if get(/databases/$(database)/documents/User/$(request.auth.uid)).data.newswriter == true;
    }

With this rule, we are allowing authenticated users to read documents in the “News” collection. 
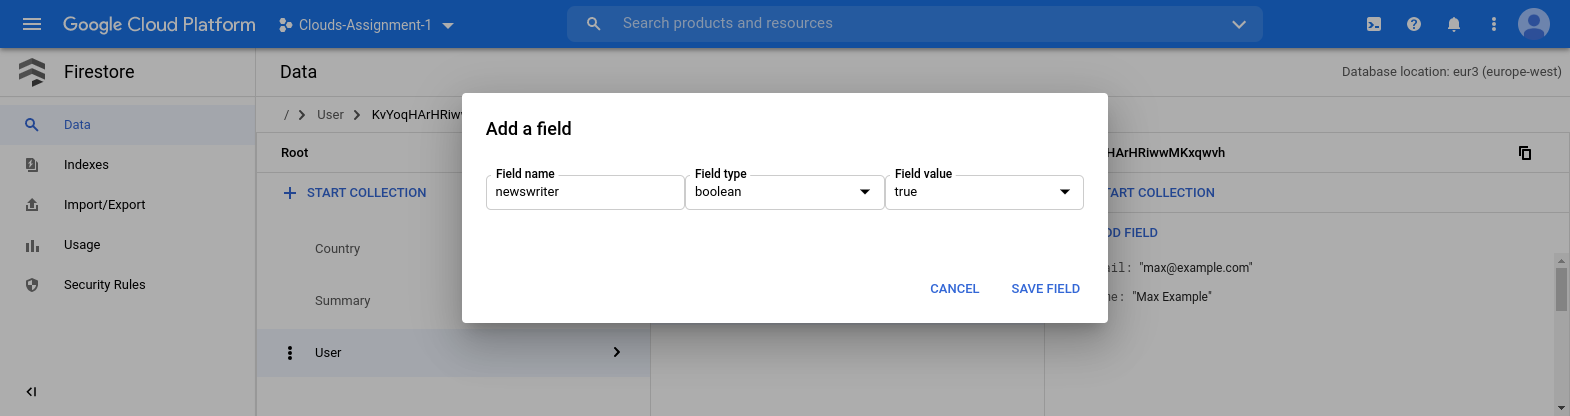
Additionally, users who have the newswriter property set to true are also allowed to create new documents (but not edit existing ones!). That’s why we set the newswriter property to false in the Firebase signin function from the previous step.

The Firebase documentation has many more rule examples and explanations.

Now the user should be allowed to write to the database, we just need to write the client-side code for it.

 1
 2
 3
 4
 5
 6
 7
 8
 9
10
11
12
13
14
15
16
17
18
19
20
21
22
23
24
25
26
27
28
29
<script src="https://www.gstatic.com/firebasejs/8.0.2/firebase-firestore.js"></script>
<script>
  function postNews(description) {
      // connect to Firestore database
      const db = firebase.firestore();

      // verify the user is logged in
      const user = loggedInUser;
      if (!(user && user.displayName && user.uid)) {
          console.error("User not authenticated");
          return;
      }

      // create the news document to be stored in the database
      const news = {
          description: description,
          timestamp: (new Date()).toISOString(),
          author: user.displayName,
          uid: user.uid,
      };

      // add the document to the "News" collection
      db.collection("News").add(news).then(function(docRef) {
          console.log("Document written with ID: ", docRef.id);
      }).catch(function(error) {
          console.error("Error adding document: ", error);
      });
  }
</script>

Obviously, the Firebase SDK must have been initialized and the user must have been signed in before executing the function.

Note that here we are storing the document in the “News” collection by calling .add() (line 23). Unlike the .set() function we used previously, .add() always creates a new document with a random ID in the database.

Screenshot of setting the newswriter attribute to true for the user account in Cloud Firestore Viewer

Again time for a quick test. Apply the new Firestore rules, set the newswriter field to “true” for your user account, reload your web page, sign in and try it in the developer console:

> postNews("Hello, world!");
NEWS {description: "Hello, world!", timestamp: "2020-11-18T20:15:29.462Z", author: "Max Example", uid: "KvYoqHArHRiwwMKxqwvh"}
Document written with ID:  qEVv5gcwBC3KJGCDkqvx

Check the Cloud Firestore Viewer:

Screenshot of Cloud Firestore Viewer showing News collection with newly created document

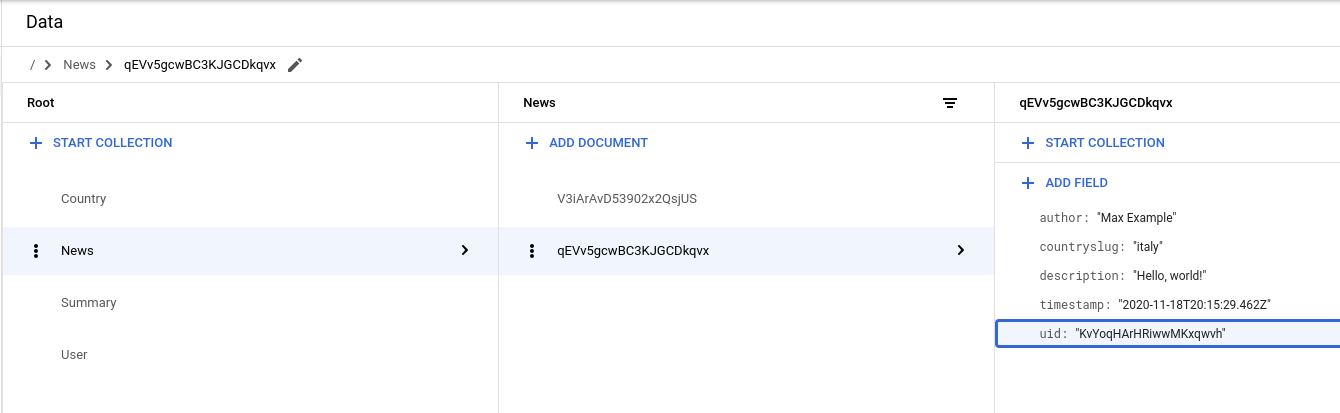
It works! If it doesn’t work (it took me more than a couple of attempts), I suggest take a close at the data your are sending (i.e. the news document) and the fields allowed by your Firestore rules.

I will the integration of postNews into the UI your web app up to you.

#  Optional loading of Firebase SDK

The setup so far works and fullfills the basic usecase. But I didn’t like that just in order to give the user the option to sign in with Firebase I had to load the Firebase SDK for each user. While the Firebase SDK is not terribly bloated (around 1MB), it’s also not necessary to fetch and initialize it on each page load.

Thus, I developed a small wrapper around the components shown so far. By default, the Firebase SDK is not loaded. It will only be loaded when the user clicks on “Sign In”. At the same time, I also set a cookie to remember that the user is currently logged in with Firebase. After the page loads and only if this cookie is set, the Firebase components are automatically loaded. This is necessary to transparently log in the user on each subsequent page.

The first step for this was to a write a function that would load the Firebase SDK components on-demand, instead of on each page load. It took me quite a while to find a to make the function wait (block) until the loading of Firebase components finishes, because this is inherently an asynchronous process. In particular, I wanted to avoid ending up in callback hell, thus I’m really happy to share this approach using JavaScript Promises here.

 1
 2
 3
 4
 5
 6
 7
 8
 9
10
11
12
13
14
15
16
17
18
19
20
21
22
23
24
25
26
27
28
29
30
31
32
33
34
35
36
37
38
39
40
41
42
43
44
45
46
47
48
// ScriptLoader adapted from https://timber.io/snippets/asynchronously-load-a-script-in-the-browser-with-javascript/
class ScriptLoader {
    constructor (src) {
        return new Promise((resolve, reject) => {
            // Create script element and set attributes
            const script = document.createElement('script');
            script.type = 'text/javascript';
            script.async = true;
            script.src = src;

            // Append the script to the DOM
            const el = document.getElementsByTagName('script')[0];
            el.parentNode.insertBefore(script, el);

            // Resolve the promise once the script is loaded
            script.addEventListener('load', () => {
                resolve(script);
            })

            // Catch any errors while loading the script
            script.addEventListener('error', () => {
                reject(new Error(`${src} failed to load.`));
            })
        })
    }
}

let firebaseLoaded = false;
async function loadFirebase() {
    if (firebaseLoaded == true) {
        console.debug("Firebase components already loaded, skipping.");
        return;
    }

    try {
        await new ScriptLoader('https://www.gstatic.com/firebasejs/8.0.2/firebase-app.js');
        await new ScriptLoader('https://www.gstatic.com/firebasejs/8.0.2/firebase-auth.js');
        await new ScriptLoader('https://www.gstatic.com/firebasejs/8.0.2/firebase-firestore.js');
    } catch (e) {
        console.error("Failed to load Firebase components:", e);
    }

    // initialize firebase object
    firebase.initializeApp(firebaseConfig);

    firebaseLoaded = true;
    console.debug("Finished loading firebase components");
}

Now, before doing any interaction with the Firebase object, we just need to make sure the components are loaded:

 1
 2
 3
 4
 5
 6
 7
 8
 9
10
11
12
13
14
15
16
17
18
19
20
21
22
23
24
25
26
27
28
29
30
31
32
33
34
35
36
37
38
39
40
41
42
43
44
45
46
47
48
49
50
51
52
53
54
55
56
57
58
59
60
61
62
63
let loggedInUser = null;

// this function is triggered after successful login
function signinOk(user) {
    // show the username on the webpage
    document.getElementById("username").innerHTML = user.displayName;
    // make the user object globally available
    loggedInUser = user;
    // set the cookie to remember that the user logged in
    localStorage.setItem("firebase_signin", "true");
}

function signoutHandler(e) {
    e.preventDefault();
    localStorage.removeItem("firebase_signin");
    firebase.auth().signOut().then(function() {
        console.log("Sign out successful.");
        location.reload(); // reload page to clear any left-over state
    }).catch(function(error) {
        console.error("Failed to log out:", error);
    });
}
document.getElementById("#sign-out-button").addEventListener('click', signoutHandler);

async function signinHandler() {
    e.preventDefault();
    // dynamically load firebase components
    document.getElementById("sign-in-button").innerHTML = "Loading...";
    await loadFirebase();

    // regular firebase signin flow
    const provider = new firebase.auth.GoogleAuthProvider();
    provider.addScope('email');

    firebase.auth().signInWithPopup(provider).then(function(result) {
        const user = result.user;
        signinOk(user);
    }).catch(function(error) {
        console.error("Sign in error:", error);
    });
}

async function checkAuthStatus() {
    // check if the user was previously signed in
    if (localStorage.getItem("firebase_signin") == "true") {
        // yes, so we need to load the firebase SDK
        await loadFirebase();

        // set user observer
        firebase.auth().onAuthStateChanged(function(user) {
            if (user) {
                console.debug("User already signed in");
                loggedInUser = user;
                signinOk(user);
            } else {
                console.debug("No user signed in, running signin function");
                signin();
            }
        });
    }
}

checkAuthStatus(); // runs on page load

With this approach, the Firebase SDK components will only be loaded when necessary - that is, when the user wants to sign in or is already signed in. Thereby, not only the network traffic is minimized, but also privacy impact of relying on Firebase.

#  Summary

There was a lot in this post. Here’s a quick recap:

First, we initialized the Firebase SDK, set up a basic flow for signing in and created an observer to transparently keep users logged in.

Second, we created a simple Firebase Function which writes a document for each new user to the Firestore database.

Third, we used this user document to authorize users who are allowed to write into our database (through Firestore rules) and added a client-side function which makes such a write call to the database.

Finally, we wrapped lazy-loading logic around all the Firebase specifics, so that we only need to load the SDK components when the user actually needs them.

If you made it this far, thanks for your time and I hope at least one part of this post was useful for you.