The ideal Dockerfile for a minimal Go container image
In this post I want to share my template for building container images for Go applications. My criteria are:
- minimal
- rootless
- fully functional ;-)
A minimal (as small as possible) image has the advantages that it is faster to deploy because we are using less I/O (pushing image into registry, pulling image from registry, unpacking image, mounting overlay filesystem …) and that it is minimizes the attack surface for exploits (no shell, curl or other tools available).
Continuing with security, running the application inside the container as non-root acts as an additional security measure to protect the host system. In theory, the kernel should take care of this of course, but in practice nothing is perfect, thus it’s good practice to use multiple layers of defense.
Combined together, these two measures create a third layer: a read-only filesystem (at least for the process running inside the container). This means attackers can not download any other tools on the fly (such as a reverse shell). At this point, all that’s left for them is extracting secrets from memory (a so called info dump) or ROP, both of which are pretty hard to do in memory-safe languages. But also you need to keep the read-only filesystem in mind when developing and containerizing your application. Don’t just write files here or there, but make sure you properly document the locations so that whoever is running the container knows they need to mount a volume there.
Now that we set the stage, here is the Dockerfile (detailed explanations below):
| |
In line 1 we start with the Golang image, which is based on Debian and contains all tools required for building Go applications.
If necessary, we can also install other libraries and applications that we might need to compile our application myapp.
Since there are no tools available in the final container (not even echo!), we need to create them beforehand.
In line 6 we ensure that Go’s DNS resolver will read hostnames from /etc/hosts, which is where Docker, Kubernetes and a few other container tools are putting static hosts (i.e. those not covered by DNS resolution).
By default, Go will just use DNS resolution when nothing is specified in /etc/nsswitch.conf (just like Glibc).
And since the filesystem of our FROM scratch container will be empty, we need to set the correct value in nsswitch.conf ourselves.
In line 9 we create a barebones passwd file. This will allow us to run our application as non-root in the final container. In this case I decided to go for the “nobody” user, since my application is not supposed to write any data locally. Liz Rice has described a similar technique, but she’s just copying over the entire passwd from the builder container. However, if you are writing data (for example to a persistent volume or host mount), you need to make sure that the UID is consistent and does not infer with any other applications (at least if you don’t want them to be able to read your data).
In line 13 we fetch the up-to-date list of trusted CA vendors.
This step will generate the /etc/ssl/ca-certificates.crt file, which we later copy over into the final container.
This allows our application to verify the validity of any publicly trusted certificate.
If your application does not need to talk to external service via TLS, you can also skip this.
Alternatively, you can inject only the root certificate of your organization, if that option is available to you.
In lines 16 & 17 we copy over just the go.mod and go.sum – not the entire source directory – and download the specified Go modules.
This drastically improves the effectiveness of the build cache, since this step will only need to be executed when the go.mod or go.sum files change.
However, when you are just modifying your application source code (for example adding a little printf for debugging), the cached layer can be reused.
A similar approach can be used for package managers that use a Lockfile, such as NPM and Pipenv.
Afterwards, we copy over the rest of the source directory.
In this case, I’m just copying everything, but you can of course also be more selective, for example by specifying particular directories (./src/) or files (main.go).
In line 22 we build a static, standalone binary of our Go application.
Setting CGO_ENABLED=0 ensures there is no dynamic linking involved.
Of course, when you are linking to external libraries, you will need to omit this.
The Go build tags osusergo and netgo make sure the application is also using Go’s internal user/group facilities and DNS resolver, respectively.
For more details, check out this excellent post from Martin Tournoij.
There has been some discussion around these build tags and a proposal to have a -static argument for go build, but there doesn’t seem to be any progress towards that (see Go Issue #26492).
The linker flags -s and -w tell Go to omit debugging symbols from the binary, which reduces its file size quite significantly. This is equivalent to running strip on the binary. You will still get proper stack traces with annotations, though. For more details, check out this excellent post from Filippo Valsorda.
Okay, we are done with hard part, from here on it gets straightforward because now we have prepared everything we need and only need to copy it into place.
In line 24 we launch into a new, empty container.
I’m calling the second stage final here, but that’s completely optional.
If you are not familiar with this pattern, read up on multi-stage builds.
We copy over the binary we compile previously and any other assets we might need (HTML templates, static Javascript files etc.)
Notably, we also copy over the configuration files (nsswitch.conf, passwd, ca-certificates.crt) we have created in the previous stage (line 34-36).
Finally, we switch the user from root (the default) to nobody.
Make sure this is one of the last steps in the Dockerfile.
After this instruction the container builder won’t be able to write to the filesystem anymore (e.g. COPY commands won’t work).
At runtime, if you need to write data inside the container (for example temporary files in /tmp), you can either mount a volume there or set appropriate permissions when copying the directory to the scratch container:
COPY --chown=nobody --from=builder /tmp /tmp
Yay, we made it all the way through the Dockerfile! Now you can build the image with favorite image builder (yes, there are a few):
docker image build -t myapp .
podman image build -t myapp .
buildah build-using-dockerfile -t myapp
kaniko --destination myapp --context dir:///myapp
img build -t myapp .
kim image build -t myapp
After you are done with all of this, you can use dive to verify your container image only contains the necessary files and directories:
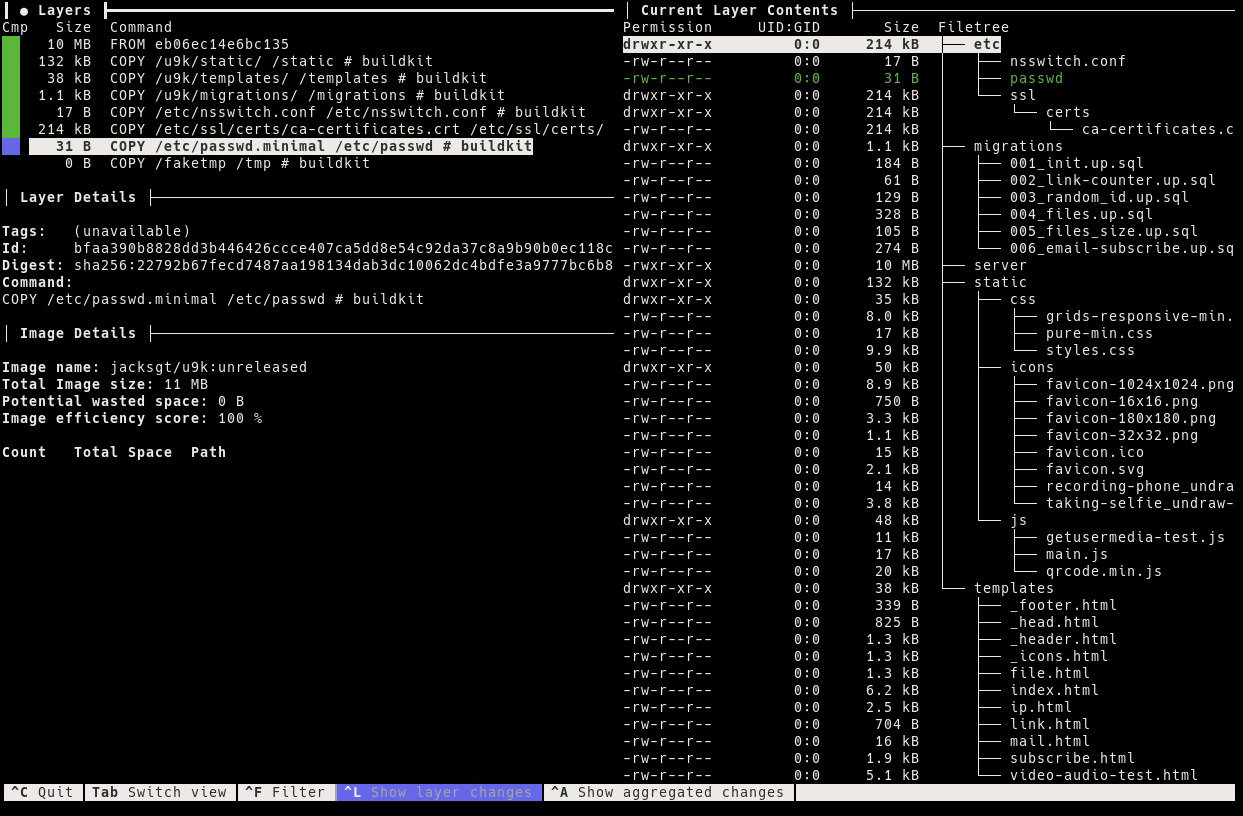
Happy building!