Complete guide to Nextcloud SAML authentication with Authentik
In my previous post I described how to import user accounts from OpenLDAP into Authentik. Now I have my users in Authentik, so I want to connect Authentik with Nextcloud. There are several options available for this:
- 1: Run the Authentik LDAP Outpost and connect Nextcloud to Authentik’s (emulated) LDAP (Nextcloud has native LDAP support)
- 2: Use the Nextcloud “Social Login” app to connect with Authentik via Oauth2
- 3: Use the Nextcloud “OpenID Connect Login” app to connect with Authentik via OIDC
- 4: Use the Nextcloud “SSO & SAML authentication” app to connect with Authentik via SAML
In this post, I’ll be exploring option number 4: SAML - Security Assertion Markup Language. I won’t go into the details about how SAML works, if you are interested in that check out this introductory blog post from Cloudflare and this deep-dive from Okta. All we need to know in this post is that SAML is a protocol that facilitates implementing Single Sign-On (SSO) between an Identity Provider (IdP), in our case Authentik, and a Service Provider (SP), in our case Nextcloud.
Authentik itself has a documentation section about how to connect with Nextcloud via SAML. While it is technically correct, I found it quite terse and it took me several attempts to find the correct configuration. Thus, in this post I will be detailing out every step (at the risk of this post becoming outdated at some point).
For reference, I’m using fresh installation of Authentik version 2021.12.5, Nextcloud version 22.2.3 as well as “SSO & SAML authentication” app version 4.1.1.
The Authentik instance is hosted at auth.example.com and Nextcloud at cloud.example.com.
Furthermore, both instances should be publicly reachable under their respective domain names!
I first tried this with a setup on localhost, but then the URLs I was typing into the browser didn’t match the URLs Authentik and Nextcloud need to use to exchange messages with each other.
Note that if you misconfigure any of the following settings (either on the Authentik or Nextcloud side), you will be locked out of Nextcloud, since Authentik is the only authentication source in this scenario.
But worry not, you can always go to https://cloud.example.com/login?direct=1 and log in directly with your Nextcloud admin account.
# Authentik
After installing Authentik, open https://auth.example.com/if/flow/initial-setup/ to set the password for the admin user.
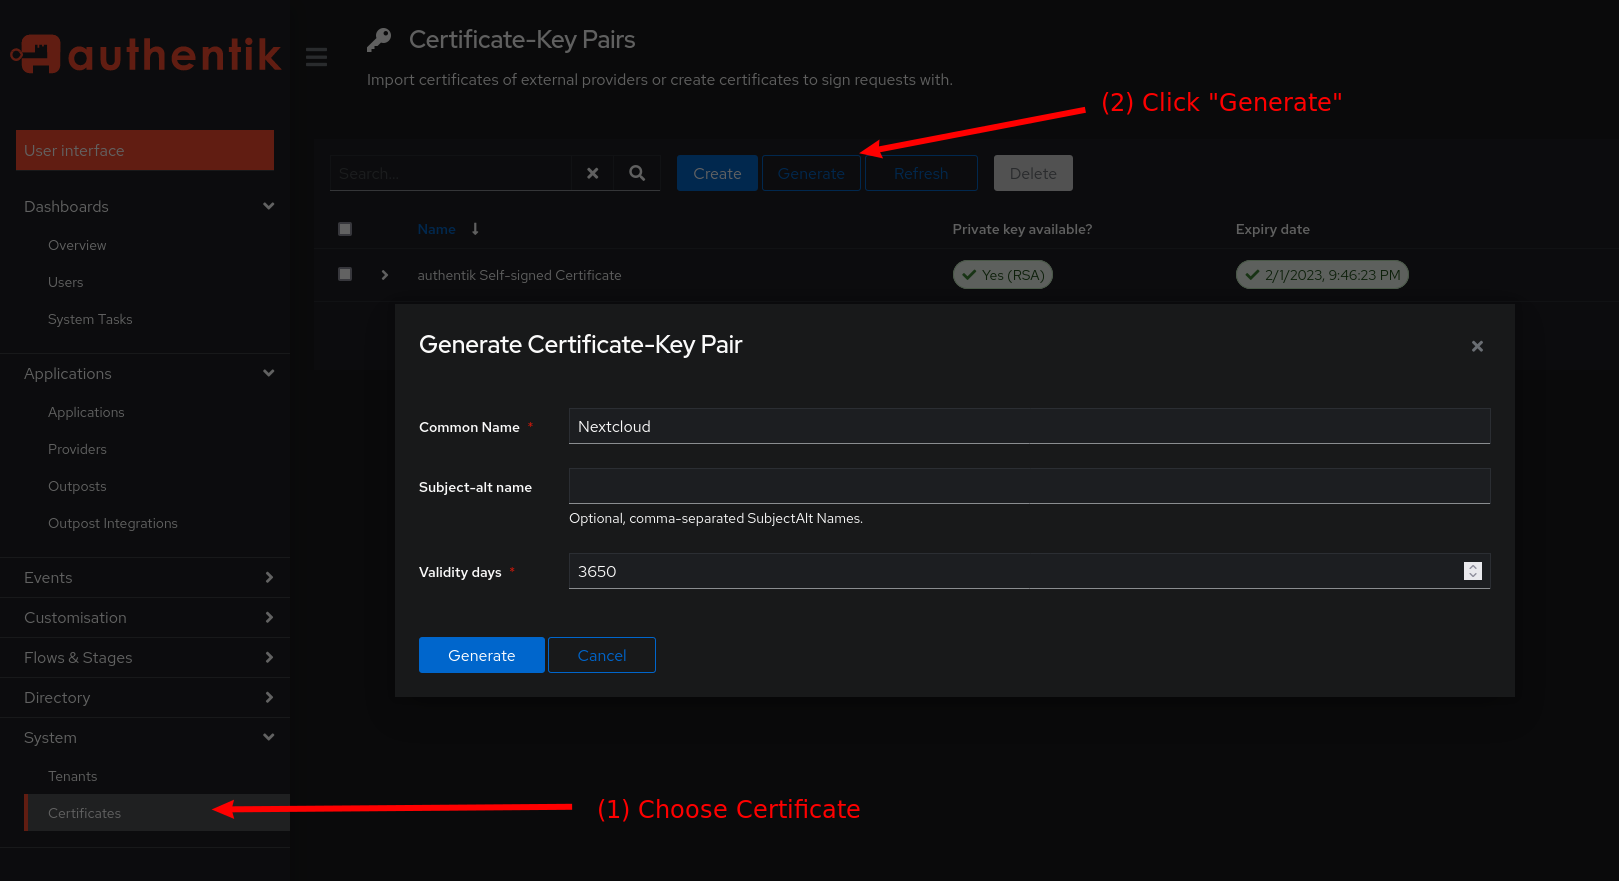
On the Authentik dashboard, click on System and then Certificates in the left sidebar.
There, click the Generate button to create a new certificate and private key.
As a Name simply use Nextcloud and for the validity use 3650 days.
Then, click the blue Generate button.
Afterwards, download the Certificate and Private Key of the newly generated key-pair.
Also download the Certificate of the (already existing) authentik self-signed certificate (we will need these later).
Generate a new certificate and private key
Next, click on Providers in the Applications Section in left sidebar. Click the blue Create button and choose “SAML Provider”
Authentik Providers Overview

To configure the SAML provider, use the following settings:
- Name:
nextcloud-saml - Authorization flow: choose the
implicitorexplicitauthorization. Explicit means the users will be asked wether they want to give their username and email address to Nextcloud before logging in, with implicit they won’t get asked. - ACS URL:
https://cloud.example.com/apps/user_saml/saml/acs - Issuer:
https://cloud.example.com/apps/user_saml/saml/metadata[1] - Service Provider Binding:
POST - Audience:
https://cloud.example.com/apps/user_saml/saml/metadata - Signing certificate:
authentik self-signed certificate - Verification certificate:
Nextcloud - Property mappings: select all entries (default)
- NameID Property mapping:
User ID - the rest of the fields you can leave as they are
Don’t forget to click the blue Create button at the bottom. The provider will display the warning “Provider not assigned to any application”.
[1] This might seem a little strange, since logically the issuer should be Authentik (not Nextcloud). However, when setting any other value for this configuration, I received the following error:
Invalid issuer in the Assertion/Response (expected 'https://cloud.example.com/apps/user_saml/saml/metadata', got 'https://auth.example.com')
Here is the full configuration of the new Authentik Provider:
New Authentik SAML Provider

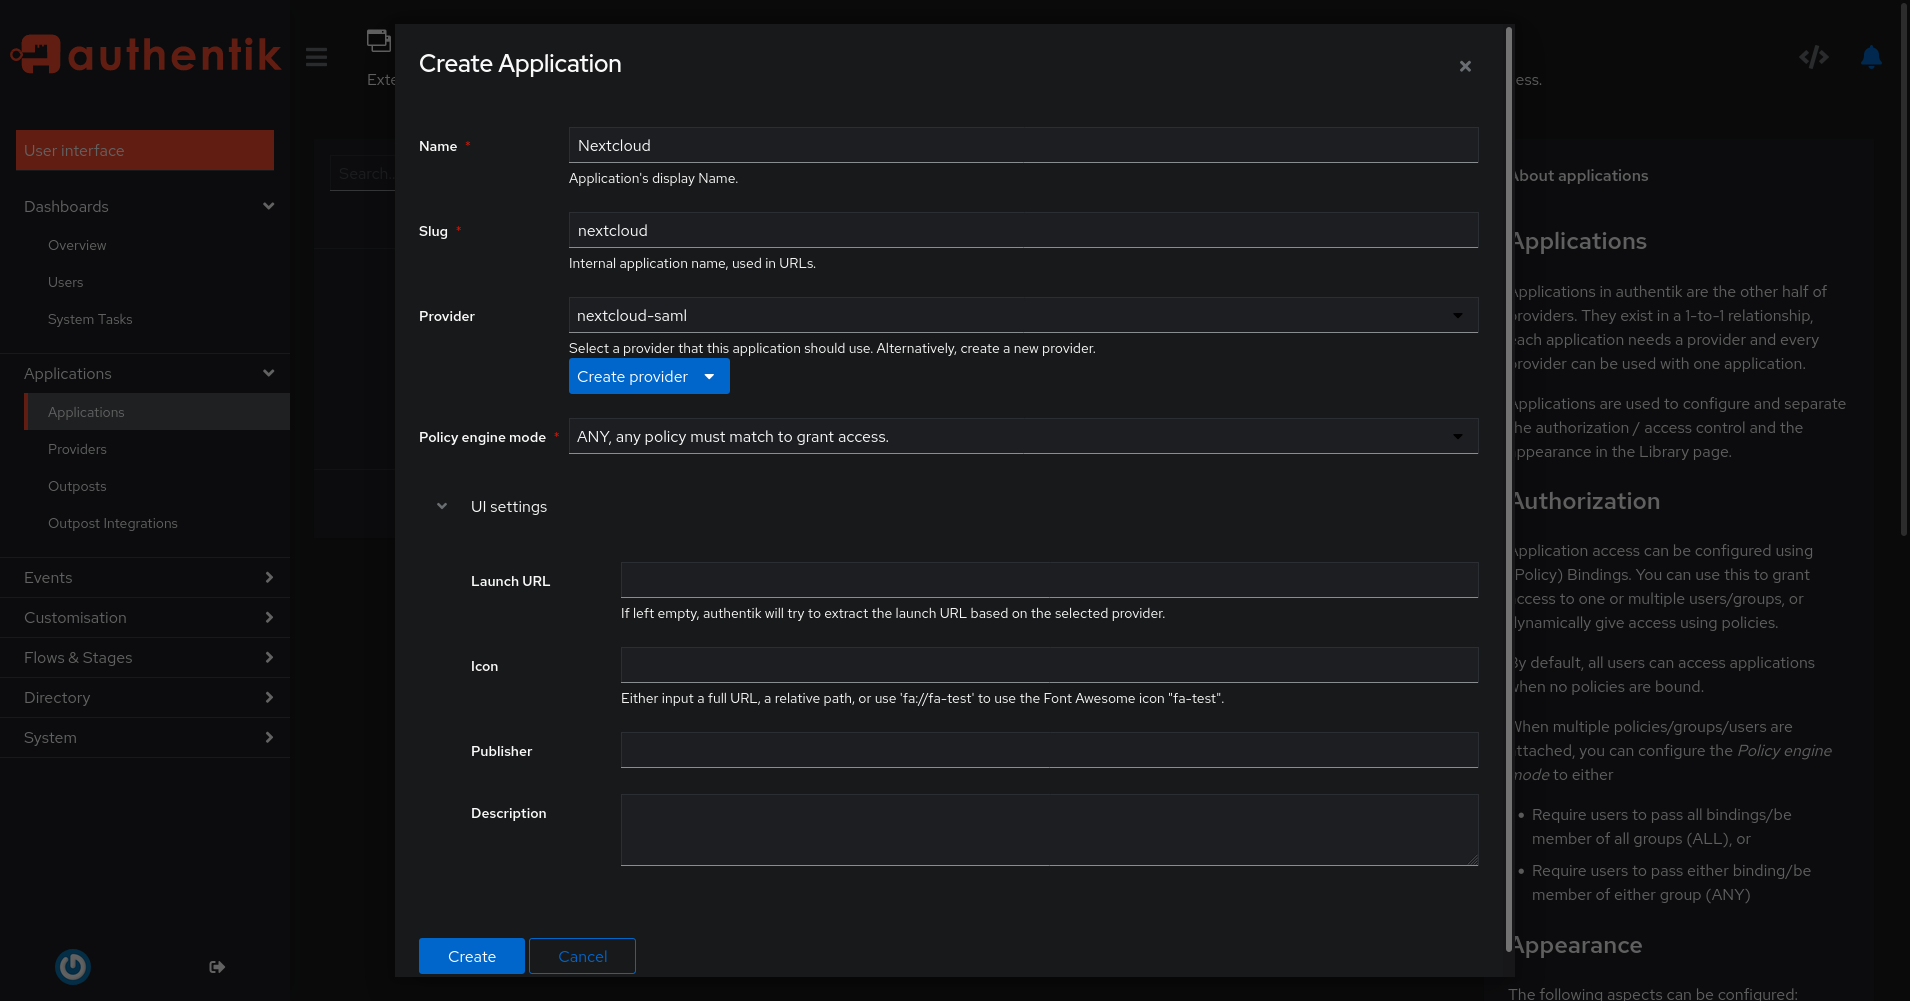
Finally, we are going to create an Application in Authentik. Click on Applications in the left sidebar and then click on the blue Create button. Use the following settings:
- Name:
Nextcloud - Slug:
nextcloud(do not change this, otherwise the following settings won’t work!) - Provider:
nextcloud-saml(this must match the name of your Provider)
Again, click Create at the bottom.
New Authentik Application
That’s it for the Authentik part! Now, head over to your Nextcloud instance.
# Nextcloud
First of all, if your Nextcloud uses HTTPS (it should!) and is behind a reverse proxy (e.g. HAProxy, Traefik, Caddy), you need to explicitly tell Nextcloud to use https://.
This will be important for the authentication redirects.
To do this, add the line 'overwriteprotocol' => 'https' to your Nextcloud’s config/config.php (see Nextcloud: Reverse Proxy Configuration).
Now, log in to your Nextcloud instance at https://cloud.example.com as an admin user.
Click on your user account in the top-right corner and choose “Apps”.
On this page, search for the “SSO & SAML authentication” app (Ctrl-F SAML) and install it.
After that’s done, click on your user account symbol again and choose “Settings”. Locate the SSO & SAML authentication section in the left sidebar.
Nextcloud SAML Configuration
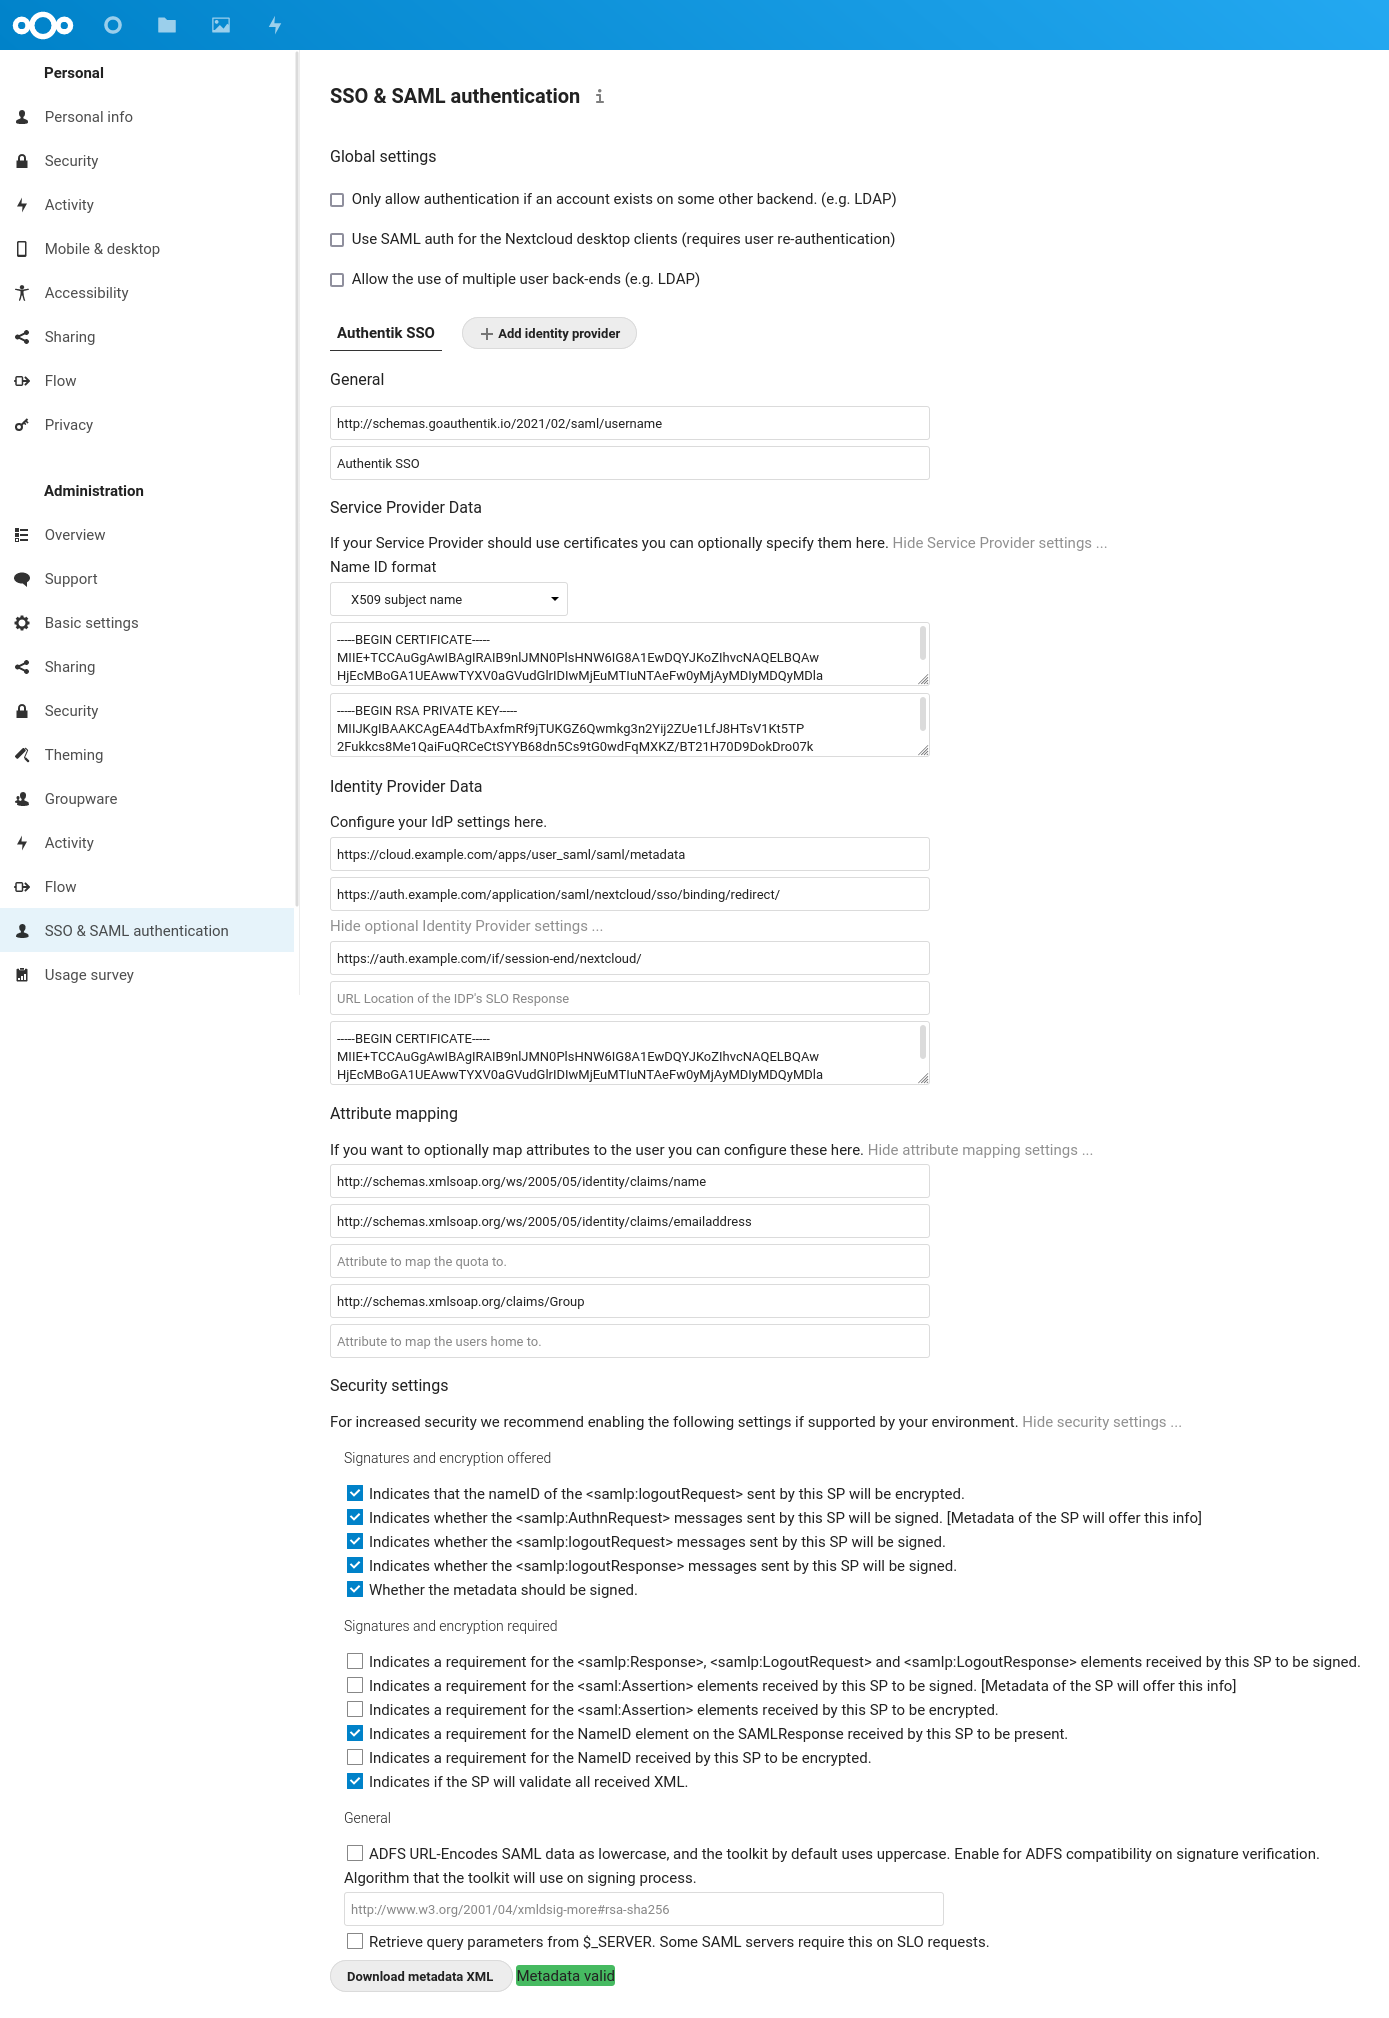
Use the following settings (notice that you can expand several sections by clicking on the gray text):
- General
- Attribute to map UID to:
http://schemas.goauthentik.io/2021/02/saml/username - Display name of Identity Provider:
Authentik SSO - Service Provider Data
- Choose
X509 subject nameand insert theNextcloudcertificate and private key you downloaded from Authentik (the one that was generated) - Identity Provider Data
- Identifier of the IdP:
https://cloud.example.com/apps/user_saml/saml/metadata - URL Target of the IdP where the SP will send the Authentication Request Message:
https://auth.example.com/application/saml/nextcloud/sso/binding/redirect/ - URL Location of IdP where the SP will send the SLO Request:
https://auth.example.com/if/session-end/nextcloud/ - URL Location of SLO Response: (empty)
- Public X.509 certificate of the IdP: insert the certificate you downloaded from
authentik self-signed certificate - Attribute mapping
- Attribute to map the displayname to:
http://schemas.xmlsoap.org/ws/2005/05/identity/claims/name - Attribute to map the email address to:
http://schemas.xmlsoap.org/ws/2005/05/identity/claims/emailaddress - Attribute to map the users groups to:
http://schemas.xmlsoap.org/claims/Group - Security settings
- Indicates that the nameID of the samlp:logoutRequest sent by this SP will be encrypted.
- Indicates whether the samlp:AuthnRequest messages sent by this SP will be signed.
- Indicates whether the samlp:logoutRequest messages sent by this SP will be signed.
- Indicates whether the samlp:logoutResponse messages sent by this SP will be signed.
- Whether the metadata should be signed.
- Indicates a requirement for the samlp:Response, samlp:LogoutRequest and samlp:LogoutResponse elements received by this SP to be signed.
- Indicates a requirement for the saml:Assertion elements received by this SP to be signed.
- Indicates a requirement for the saml:Assertion elements received by this SP to be encrypted.
- Indicates a requirement for the NameID element on the SAMLResponse received by this SP to be present.
- Indicates a requirement for the NameID received by this SP to be encrypted.
- Indicates if the SP will validate all received XML.
Finally, after you entered all these settings, a green Metadata valid box should appear at the bottom.
Note that there is no Save button, Nextcloud automatically saves these settings.
I would have liked to enable also the lower half of the security settings. These require that the assertion sent from the IdP (Authentik) to the SP (Nextcloud) is signed / encrypted with a private key. Unfortunately, I could not get this working, since I always got the following error messages (depending on the exact setting):
The Message of the Response is not signed and the SP requires it
The Message of the Response is not encrypted and the SP requires it
No InResponseTo at the Response, but it was provided the requestId related to the AuthNRequest sent by the SP: ONELOGIN_bf5cc45cd77bd413aa3d334f79a2f41c05d43ff8
If anyone has an idea how to resolve this, I’d be happy to try it out and update this post.
# Try it out
After entering all those settings, open a new (private) browser session to test the login flow. Use one of the accounts present in Authentik’s database (you can use the admin account or create a new account) to log into Nextcloud.
This is what the full login / logout flow should look like:
# Conclusion
Overall, the setup was quite finicky and it’s disappointing that the official documentation is locked behind a paywall in the Nextcloud Portal. Furthermore, the issue tracker of “SSO & SAML authentication” has lots of open and unanswered issues and the app still doesn’t support the latest release of Nextcloud (23) - an issue has been open about this for more than two months (despite the fact that it’s a “Featured” app!).
In the end, I’m not convinced I should opt for this integration between Authentik and Nextcloud. What do you think?
# References
- Authentik: Nextcloud integration
- Enable Nextcloud SAML SSO Authentication through Microsoft Azure Active Directory
- Nextcloud 12: Configuring SSO with SAML
- SSO & SAML App: “Account not provisioned” error message
- SSO & SAML App: HTTP 405 error
- Nextcloud SSO with Keycloak and SAML
- Keycloak as SAML SSO-Authentication provider for Nextcloud