Migrating users from LDAP to Authentik
For several years (the earliest timestamp I could find is from 2016), I have been using OpenLDAP (a.k.a slapd) as the source of truth for user accounts in my homelab. The initial setup was tricky – especially figuring out the “memberOf” overlay to get group memberships – but once I had it nailed down and put it into Puppet manifests, it was rock solid. The setup is still rock solid, but definitely starts showing its age: friendly user-interfaces for self-service are rare (I’ve been using LTB’s Self Service Password, but it only allows users to change their password, not email address etc.), and modern features like multi-factor authentication need to be re-implemented by each application, instead of being centrally managed by the authentication source.
Thus, in 2022 it was time to look for something new. There are lots of choices available in this space, but Authentik in particular struck me as simple to set up and use. For this reason it seems that in recent months Authentik has become a bit of a “secret tip” in self-hosting circles.
Despite the small number of users of my homelab, I was reluctant to start from scratch with my authentication source. I was looking for a way to automatically import the user accounts from OpenLDAP into Authentik – and it turns out that Authentik makes this super easy, if you know what to look for. The following guide shows how to set up and use an LDAP Source in Authentik, and that it can simply be removed again without deleting the user accounts, thereby acting as an import functionality.
# Setup
My (old) setup consists of an OpenLDAP server (slapd 2.4.47 on Debian 10 Buster) with TLS encryption (i.e. ldaps instead of StartTLS).
Authentik is version 2021.12.5 and installed with their official Helm chart 5.2.1:
| |
After adding the Helm repository , run helm install authentik authentik/authentik and then open https://auth.example.com/if/flow/initial-setup/ to set a password for the admin user.
# Syncing with OpenLDAP
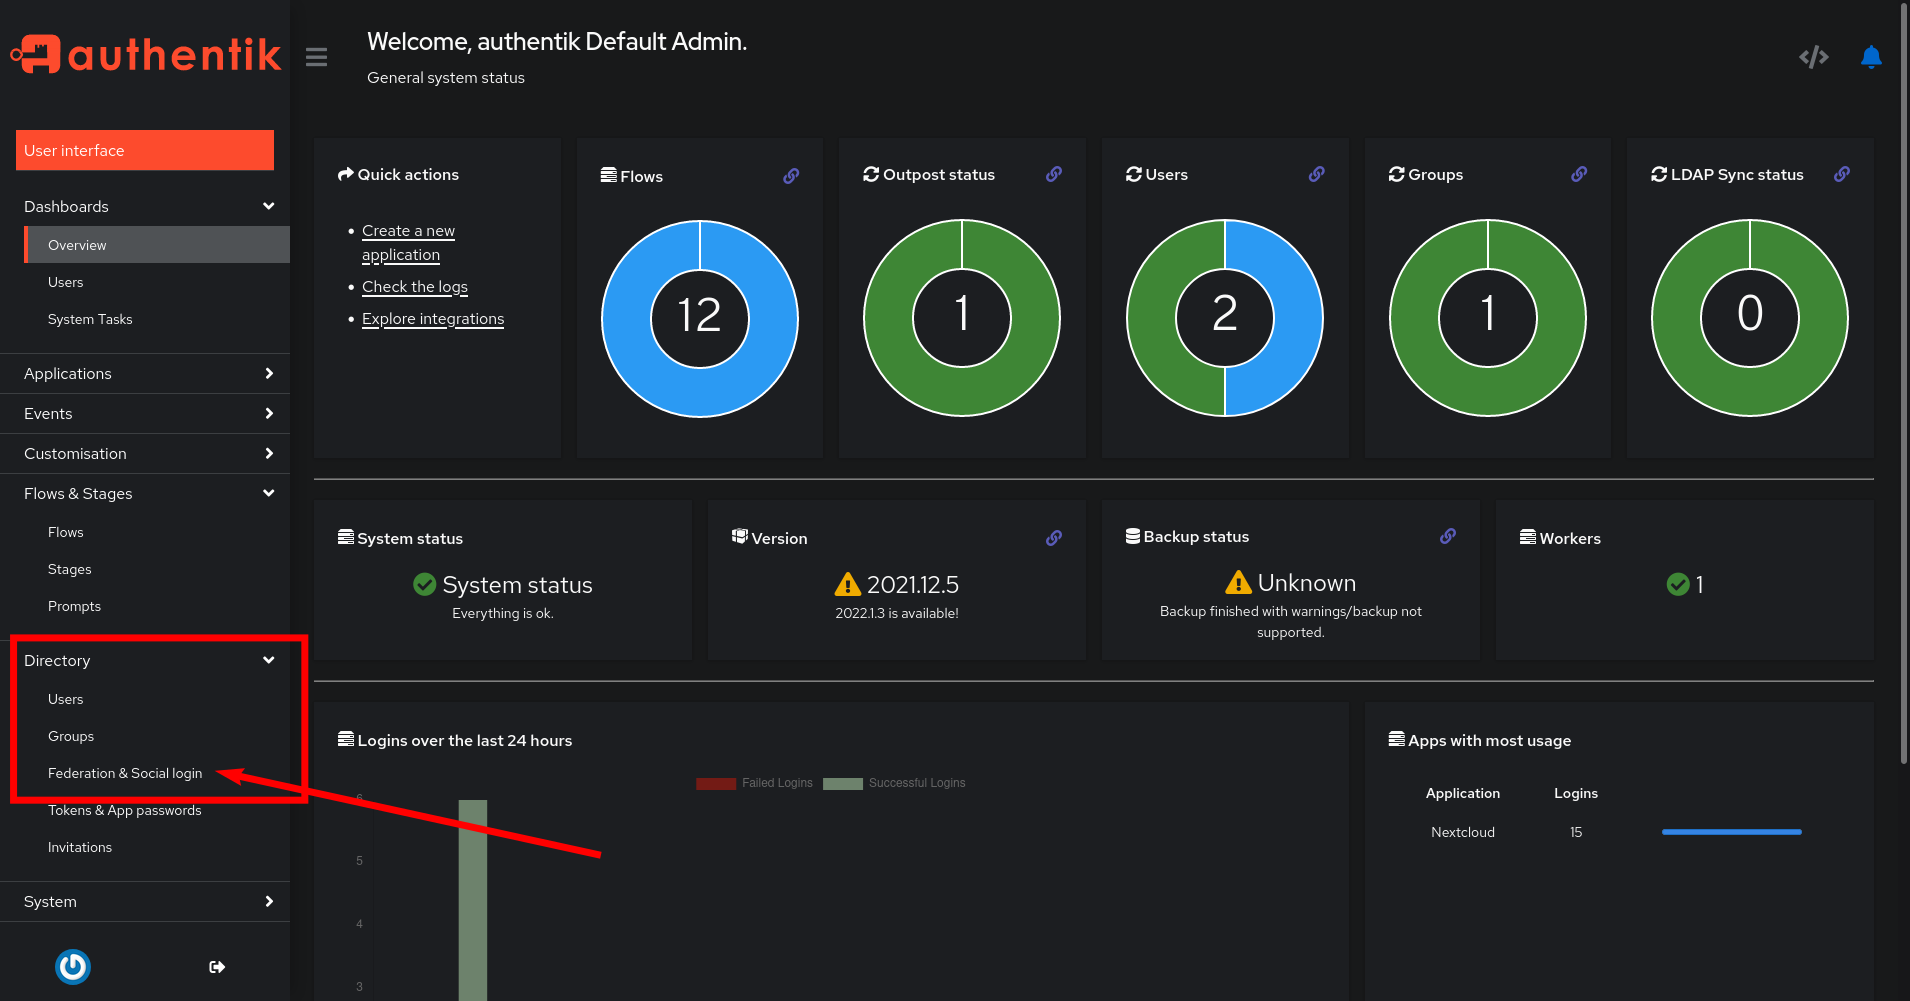
After logging in as the admin user, you should be greeted with the following dashboard. Navigate to the “Directory” section in the left sidebar and choose “Federation & Social Login”. Then, click the blue “Create” button and select “LDAP Source”.
Authentik Dashboard Overview
Give your LDAP Source a human-friendly name and a unique identifier (slug). Then, scroll down to the Connection settings section.
Here is the full configuration I used. Below you will find detailed explanations for each field.
Authentik LDAP Source configuration
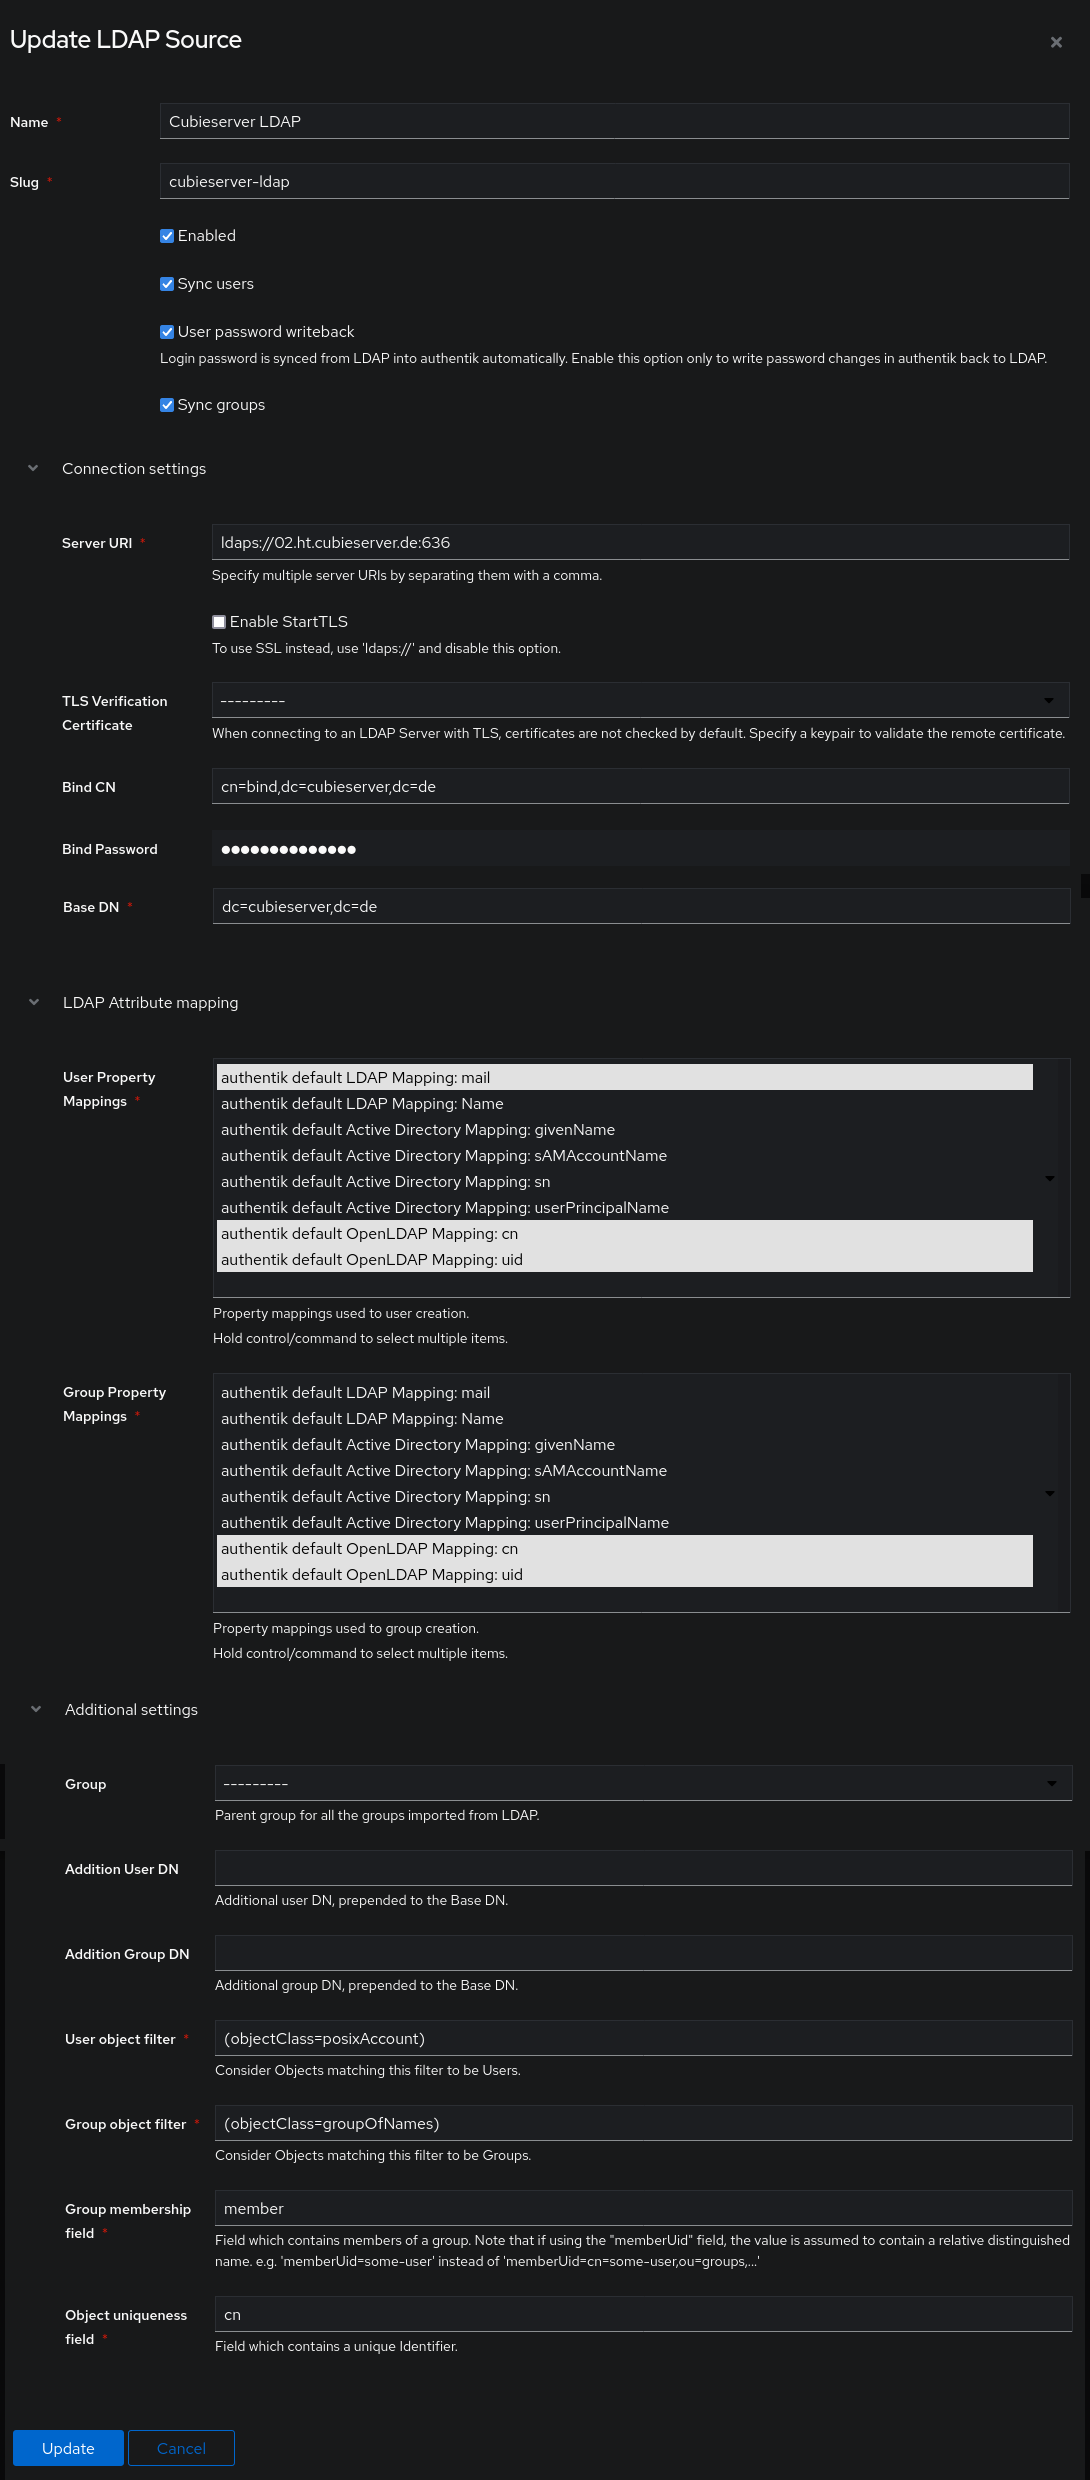
For the Server URI you can either use ldap://1.2.3.4 or ldap://example.com if your server is un-encrypted OR uses StartTLS (in this case tick the checkbox below), or ldaps://example.com if your server uses regular TLS encryption.
Optionally, you can specify a port if your server uses a non-default port (add :386 for regular connections or :686 for TLS-encrypted connections at the end).
If your server uses the encrypted LDAP protocol and does not use a publicly trusted (self-signed) TLS certificate, then you first need to import this certificate into Authentik and then select it in TLS Verification Certificate. Otherwise, you can leave this field empty.
Enter the CN and Password of a user account that can bind to the LDAP server.
Enter the Base DN for your LDAP directory – this can be used to only import part of your user tree.
Next, we configure the LDAP Attribute Mapping section. To do this correctly, you should first take a look at your LDAP schema to figure out which attributes are present for your users and groups.
If your are running OpenLDAP (like me), one excellent way to do this is simply dumping the entire LDAP database with slapcat:
slapcat -b "$BASE_DN"

...
dn: cn=Git,ou=Groups,dc=cubieserver,dc=de
cn: Git
objectClass: groupOfNames
objectClass: top
owner: cn=admin,dc=cubieserver,dc=de
structuralObjectClass: groupOfNames
entryUUID: 55e6b8f6-7370-1035-8c1d-b5b0eb6b5c72
creatorsName: cn=admin,dc=cubieserver,dc=de
createTimestamp: 20160229203955Z
member: cn=Mr Cubie,ou=People,dc=cubieserver,dc=de
modifiersName: cn=admin,dc=cubieserver,dc=de
modifyTimestamp: 20170506200330Z

...
dn: cn=Mr Cubie,ou=People,dc=cubieserver,dc=de
objectClass: posixAccount
objectClass: inetOrgPerson
objectClass: organizationalPerson
objectClass: person
uid: cubie
cn: Mr Cubie
structuralObjectClass: inetOrgPerson
entryUUID: f05f8080-7752-1035-8092-8fc71d8bef3a
creatorsName: cn=admin,dc=cubieserver,dc=de
createTimestamp: 20160305191934Z
mail: cubie@example.com
memberOf: cn=Git,ou=Groups,dc=cubieserver,dc=de
userPassword:: XXXXXXXXXXXXXXXXXXXXXXXXXXXFpHSmg=
modifiersName: cn=admin,dc=cubieserver,dc=de
modifyTimestamp: 20190723062033Z
In the example above I have included one user and one group of my schema. Among all the noise, there are a couple of important fields to note here:
- users have
cn,uidandmailattributes ⟶ select these fields in User Property Mappings. - groups have just the
cnattribute ⟶ select this field in Group Property Mappings. - groups have
objectClass: groupOfNames⟶ use Group object filter(objectClass=groupOfNames). - users have
objectClass: posixAccount⟶ use User object filter(objectClass=posixAccount). - group membership is indicated by the
memberattribute ⟶ use Group membership fieldmember. - users are uniquely identified by the
uidattribute, but groups don’t have that. However, both have thecn(Common Name) attribute ⟶ use as the Object uniqueness field.
Finally, after you filled in all those fields, click the blue Create button at the bottom.
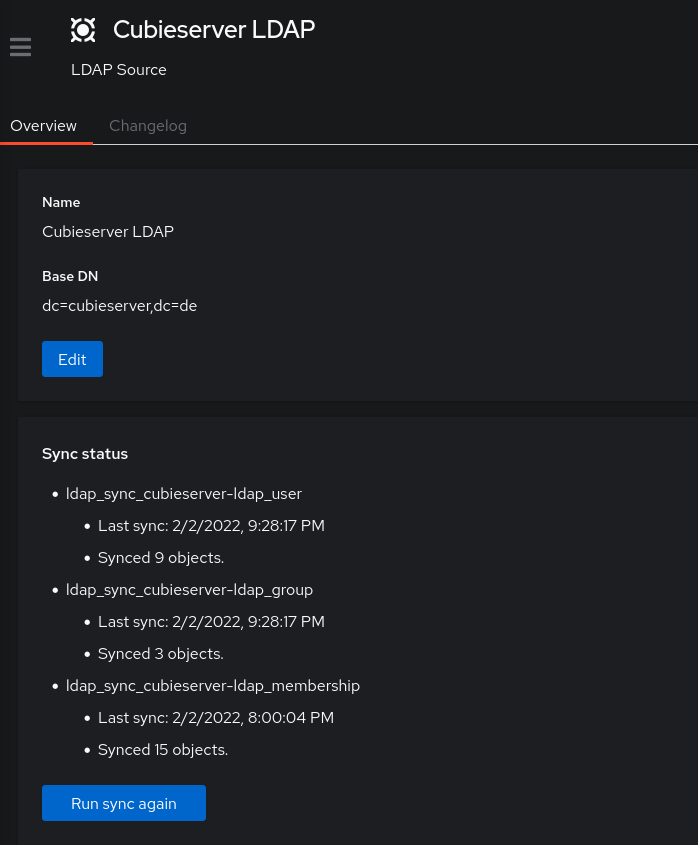
Choose the newly created authentication source and click the blue Run Sync button. Depending on the size of your LDAP database, this might take a while (in my case it’s pretty insignificant). Authentik will helpfully display the number of synced users, groups and group memberships. If there are any errors, it will also report them here. In that case, you need to go back to edit your LDAP source and fiddle with the attributes and mappings.
Successful LDAP Synchronization
After a successful synchronization, you should see the users and groups by clicking on Users under Directory in the left sidebar. Here you should check that the user attributes have been imported fully and mapped correctly.
Users after import into Authentik

# Removing the Sync
After you verified all users, groups and membership have been imported correctly, you can return to the Federation & Social Login and simply remove the LDAP Source created previously.
Yes, that’s it. I’m not sure if its a feature or a bug (because the first time I did this I was expecting all the LDAP users to be deleted from the database again, since the process is called Synchronization and not Import or Migration), but I’m really happy about this behavior. Now I can simply turn off my OpenLDAP server after 6 years of service – it has served me well and I hope Authentik will serve me just as long.