Hyperconverged ODF Ceph + RHOSO OpenStack
RHOSO - the Red Hat OpenStack Services on OpenShift - is the brand new deployment model for OpenStack 18. In a nutshell, all the control plane components of OpenStack are containerized so they can easily and quickly be deployed in a Kubernetes environment. The data plane (compute hypervisors) remains separate on dedicated machines that are not part of the OpenShift cluster.
For a recent customer project, we wanted to deploy this setup on a compact three node, bare metal OpenShift cluster (plus two additional OpenStack compute hosts). And what do you always need in a bare metal environment? That’s right: storage.
Luckily, we can use OpenShift Data Foundation (ODF) - Red Hat’s productized version of Rook - to spin up a Ceph storage cluster inside our OpenShift cluster.
There’s just one problem: out of the box, this Ceph storage can only be accessed by nodes that are part of the OpenShift cluster, i.e. external access to Ceph is not possible.
This means that the RHOSO control plane could create and use PersistentVolumeClaims (PVCs) for its services such as nova, keystone and friends, the compute nodes would not be able to access the Ceph storage where disk images, block volumes etc. are stored.
The reason is that while the compute hosts are managed by the OpenStack control plane (which runs on OpenShift), they are not part of the OpenShift cluster network and therefore cannot access services inside the cluster.
# The solution
To overcome this hurdle, we configured ODF in a special hostNetwork mode which lifts the restriction that Ceph pods can only be accessed from inside the cluster.
To keep this setup secure, we introduced a separate storage network (VLAN) and ensured all Ceph traffic remains in this separate network.
NMState was used to configure the network interfaces of the OpenShift nodes appropriately to access this storage network (in addition to the “bare metal” or “machine” network).
Then we configured the OpenStack control plane to have a foot in this storage network and gave the relevant services (nova, cinder, glance, swift) access to the Ceph cluster by creating a dedicated Ceph client.
Finally, we had to bring up the compute hosts in such a way that they also have access to the storage network.
# Environment
- An OpenShift 4.16 cluster
- Three OpenShift cluster nodes:
ocp-1,ocp-2,ocp-3 - Two OpenStack compute hosts:
compute-1,compute-2 - OpenShift machine network:
192.168.11.0/24 - Storage network with dedicated NIC:
192.168.9.0/24 - RHOSO 18.0.6 (FR2)
- ODF 4.16.10
# Disclaimer
It must be noted that while this setup works, as of May 2025 it is not supported by Red Hat. Your warranty is now void. Here be dragons.
# ODF configuration
The first step is configuring ODF in such a way that the Ceph storage cluster can be accessed outside the hosting OpenShift cluster.
To get started, we’ll configure an additional network interface on our OpenShift nodes using the Kubernetes NMState Operator.
The following policy must be created for each OpenShift cluster node, substituting ${NODE} with the actual node name and assigning a unique static IP (if you’re not using DHCP for dynamic IP address allocation).
| |
Then we create resources for MetalLB so we can actually allocate and use IP addresses on the storage network:
| |
Finally we need to set the following parameters in the StorageCluster resource:
| |
The last line here does the heavy lifting: instead of the Ceph pods being regular pods with their own network namespace, they actually run in the network namespace of the host, therefore have access to the network interface we configured in the previous step.
To avoid various Ceph components getting confused due to the fact that they are now presented with multiple network interfaces, we need to explicitly set the cluster and public address ranges. It’s important that only the cluster network uses the storage network and the public network stays on the machine network (which is reachable by all pods in the cluster), because the ODF / Rook operator pod itself does not use host networking, meaning it cannot reach the storage network.
At this point in time it’s a good idea to check that ODF still works internally (provisioning and accessing PVCs) and then validate that we can access Ceph from outside the OpenShift cluster. You can find some examples on how to do that in this article.
# RHOSO configuration
With our Ceph cluster configured in “external mode”, we can move on to creating separate Ceph credentials for accessing (parts of) the cluster. For this purpose, we use the CephBlockPool CRD provided by the Rook operator:
| |
And then we create a CephClient CRD that creates a new set of ceph credentials that access the pools mentioned above:
| |
Now we can extract the Ceph credentials:
| |
And build our Ceph client configuration files. It is very important to note that the name of the Ceph client keyring file must include the name of the Ceph client we created (see documentation for Creating a Ceph Storage Secret and User and Keyring Management).
| |
Next we proceed to configuring OpenStack control plane to use the Ceph cluster. This follows pretty much exactly the RHOSO product documentation, so have a look at that for more details, I’m just documenting the bare minimum here.
| |
In short: we configure all services to consume storage for their PersistentVolumeClaims (PVCs) from the ocs-storagecluster-ceph-rbd storage class.
In addition, the Nova (compute), Cinder (volumes), Glance (images) and Swift (object storage) services get direct access to the Ceph cluster by mounting the previously created Ceph client configuration files into their pods.
We need to ensure that these “direct access” services have “a leg in the storage network”, i.e. a network attachment needs to be requested.
Network attachment definitions are a way to allow a Kubernetes pod to access multiple networks (in addition to the default, cluster-internal network).
You can read more about them in this article.
The network attachment definition should look as follows:
| |
Finally we adjust the configuration of the OpenStack data plane, specifically for Nova (the compute service). Again, this is following very closely the relevant RHOSO product documentation
| |
This custom data plane service needs to be referenced from each OpenStackDataPlaneNodeSet to which it should be applied, like this:
| |
You can see here that we override the default nova data plane service with our nova-custom-ceph version.
It is important that the libvirt service is run before the nova service (this is an ordered list of service that are initialized on the compute hosts during EDPM provisioning).
The last puzzle piece we must not forget is the fact that the compute hosts must be configured in a way that they also have access to the storage network. This is handled via the EDPM provisioning that is defined in the OpenStackDataPlaneNodeSet and executed by a OpenStackDataPlaneDeployment.
| |
# Summary
That’s all! And it was quite a lot!
Let’s summarize what we did here, in order:
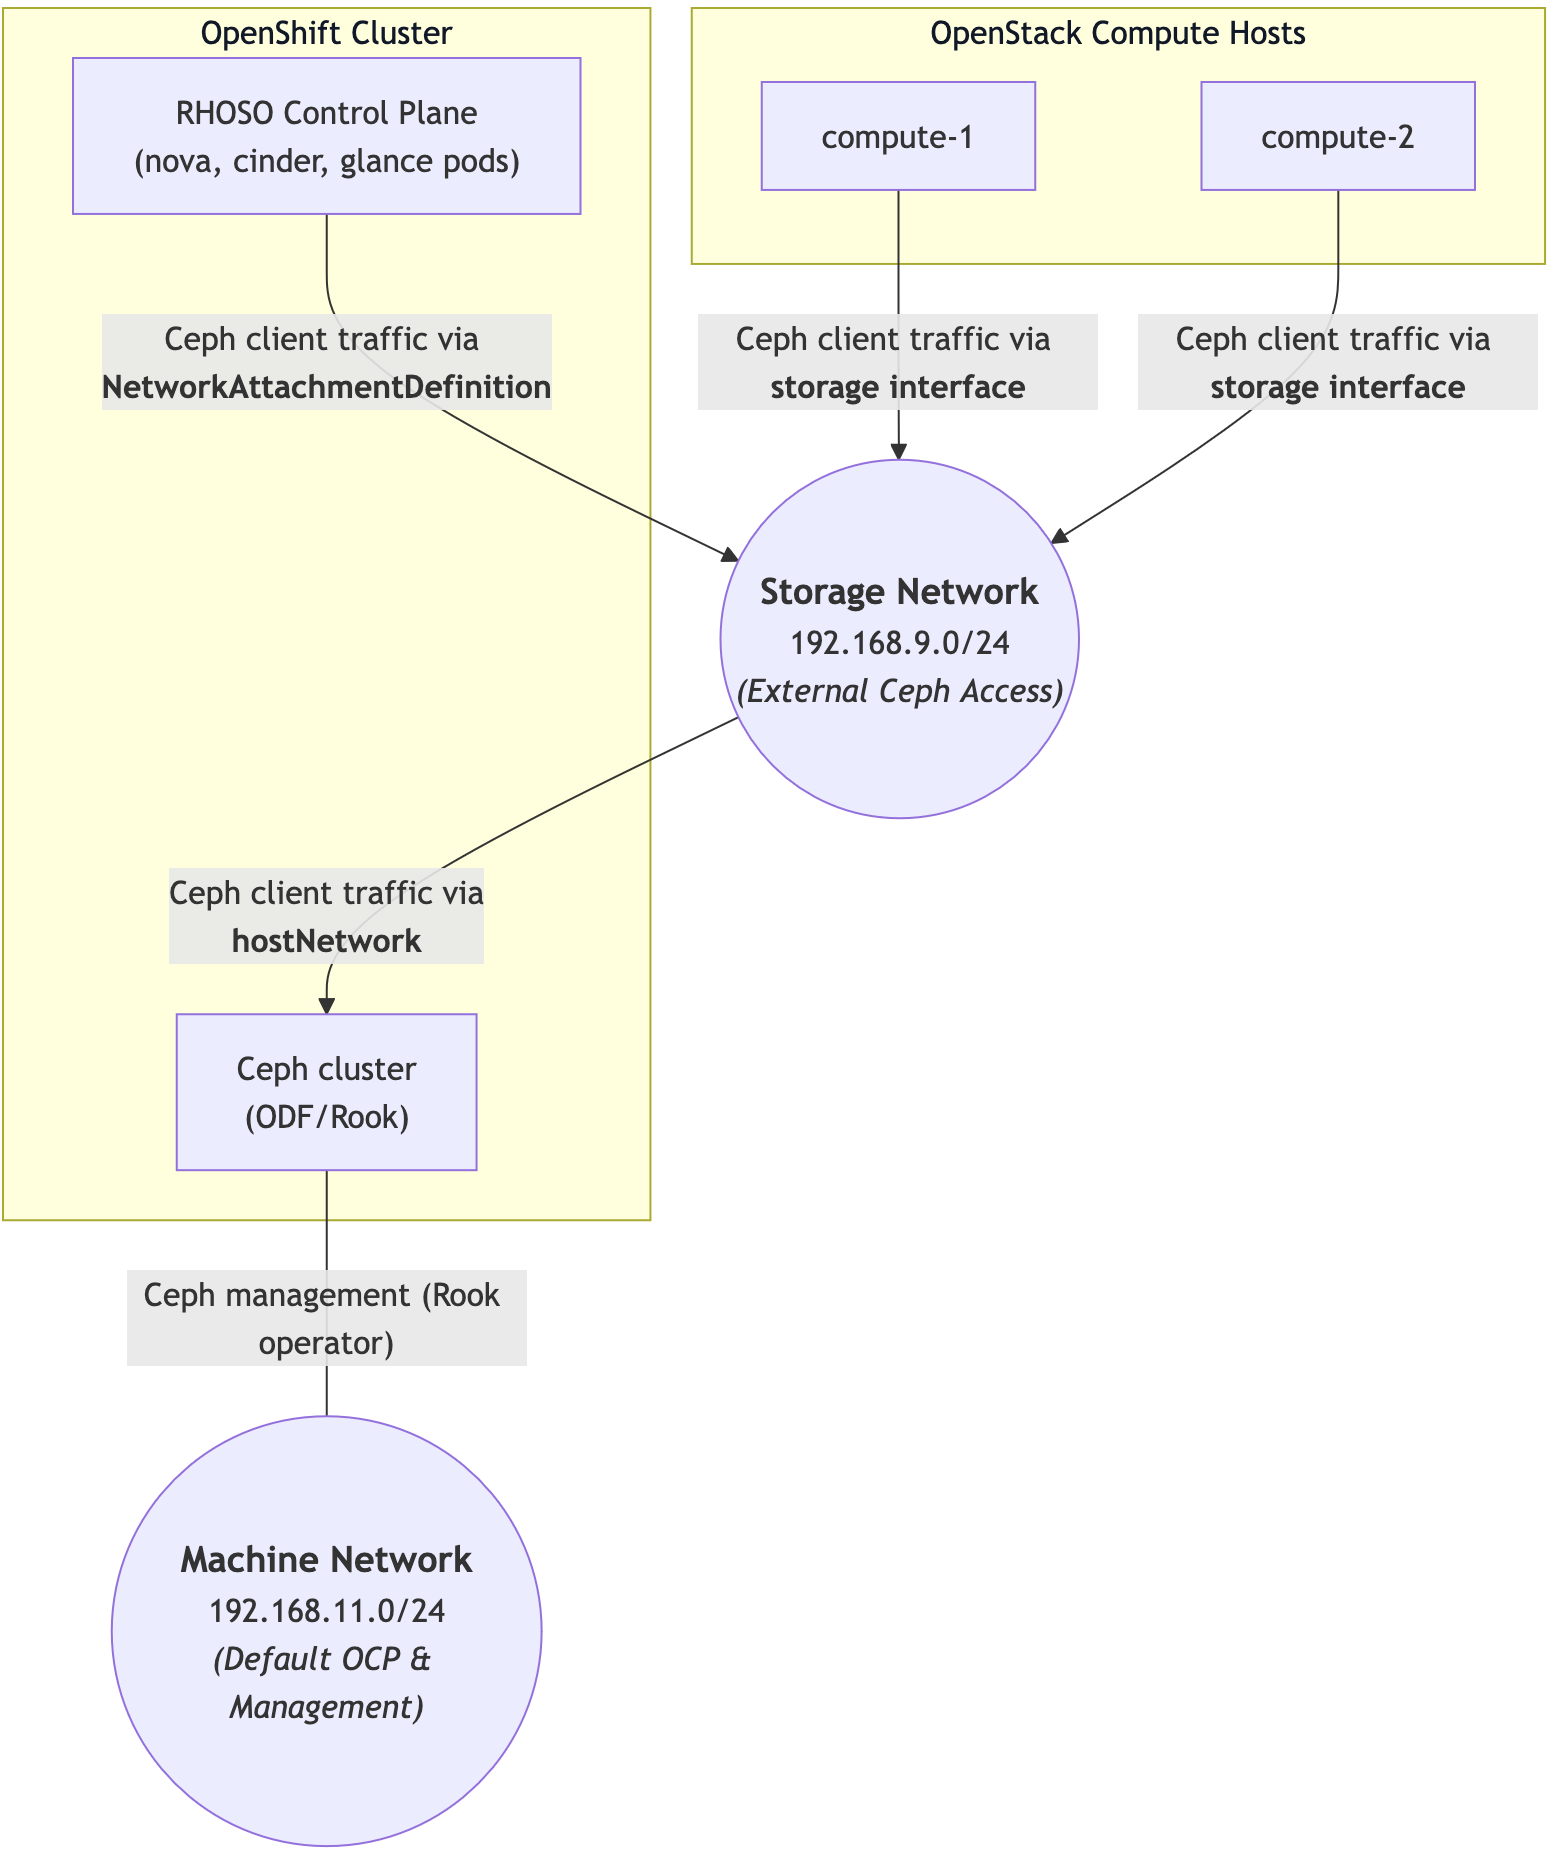
The Ceph cluster provisioned by ODF (Rook) was configured in a special hostNetwork mode allows us to - in combination with appropriate NodeNetworkConfiguratinPolicies, L2Advertisement and IPAddressPool - to access the Ceph cluster from outside the OpenShift environment.
To keep this setup secure, we introduced a separate storage network (VLAN) and ensured all Ceph traffic remains in this separate network.
Then we configured the OpenStack control plane to have a foot in this storage network via NetworkAttachmentDefinitions and gave the relevant services (nova, cinder, glance, swift) direct access to the Ceph cluster by creating a dedicated Ceph client.
We also configured the storage class for the OpenStack control plane so that the PVCs of all services consume storage from the Ceph cluster.
Finally, the configuration of the OpenStack data plane was adjusted so that the compute hosts are configured to use the storage network and connect to the Ceph cluster.
The idea behind is mostly straightforward (connect RHOSO to ODF), but the implementation is definitely non-trivial.
I hope this helps you with your own hyperconverged environment.
# What’s still missing
At this point all parts of OpenStack use the Ceph cluster provided by ODF. However, Swift is consuming Ceph in a suboptimal manner because it deploys it’s own gateway that writes storage blobs to a Ceph RBD volume (PVC). It would be better if Swift is configured as a proxy for Ceph’s Rados Gateway, so we’re using the native object storage capabilities of the Ceph storage cluster. This requires setting a separate CephObjectStore and configuring it such that it uses OpenStack’s Keystone for authentication. We did not implement this as part of this project, but I’d be happy to hear from anyone who actually did this.
# Resources
- Expose a Rook-based Ceph cluster outside of Kubernetes
- RHOSO 18 documentation: Configuring Control Plane to use Ceph backend
- RHOSO 18 documentation: Configuring Data Plane to use Ceph backend
- os-net-config configuration
- Kubernetes NMState Operator
- Ceph User Management
- OpenShift Data Foundation 4.16 documentation